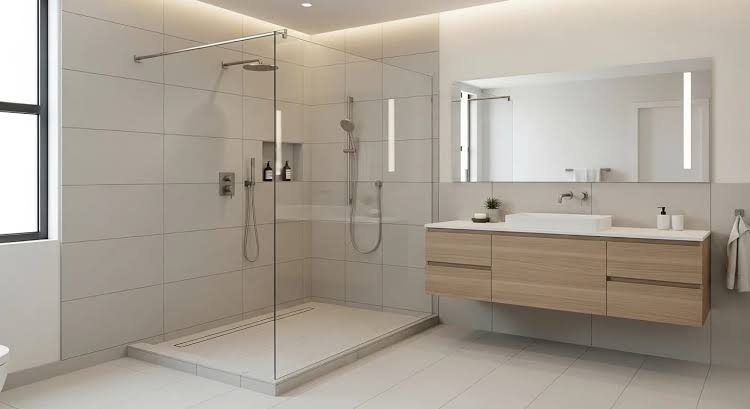
A threshold free shower removes the raised curb that traditionally separates the shower from the rest of the bathroom, replacing it with a floor that flows at one continuous level into a carefully sloped wet zone. The short answer on threshold free shower designs for a contemporary home is yes, they are an excellent fit, provided the floor slopes at least a quarter inch per foot toward a well-placed drain and the waterproofing extends beyond the shower footprint. These curbless, barrier-free layouts deliver the clean sightlines contemporary interiors demand while eliminating the trip hazard and step-over that make conventional showers difficult for older adults, wheelchair users, and anyone planning to age in place.
This guide explains what threshold-free showering really means, compares the main layout options, walks through the drainage, slope, and waterproofing details that determine success, covers the accessibility dimensions worth borrowing from formal standards, and lays out realistic costs, common mistakes, and when to call a professional.
What a Threshold-Free Shower Actually Is
The terminology causes real confusion. A walk-in shower simply means an open design, often with just a glass panel, and it may still have a low curb. A floor-level shower sits at exactly the same height as the surrounding bathroom floor, with a smooth step-free transition. A barrier-free shower goes further: it is designed to meet formal accessibility criteria, such as keeping any entry height difference to half an inch or less with a bevel, and sizing the enclosure for a wheelchair user. Threshold free shower designs can be any of the three, but the most valuable residential projects combine the floor-level transition with barrier-free dimensions.
In contemporary interiors the appeal is twofold. Visually, the unbroken floor plane makes even modest bathrooms feel larger and calmer, which is exactly what minimalist, spa-inspired design asks for. Functionally, there is no curb to step over, no door swinging into a tight room, and no ledge collecting grime. Continuous large-format tile can run straight from the bathroom floor into the shower, and a single frameless glass panel is often all the enclosure the space needs. Aging-in-place planning is a major driver too: a home a buyer can imagine living in for decades, without a future disruptive remodel, carries genuine market appeal.
Threshold Free Shower Design Options for Contemporary Bathrooms
Four layouts cover nearly every residential project, each balancing openness, water control, and build complexity differently.
The Full Wet Room
The entire bathroom becomes the shower zone: the floor is waterproofed wall to wall and slopes gently to a drain. Wet rooms deliver the most dramatic contemporary look and the easiest wheelchair access. They demand the most waterproofing and floor area, so they suit larger primary bathrooms better than compact retrofits.
Alcove Shower With a Linear Drain
Three walls enclose the shower in a recessed alcove with the open fourth side at floor level. A linear drain along the back wall lets the floor slope in a single plane, keeping large-format tiles flat and uncut. A single fixed glass panel contains spray. This is the most popular configuration for contemporary remodels and fits standard bathroom footprints.
Corner Shower With Angled Glass
The shower occupies a corner, with the drain along one wall and a frameless glass panel set at an angle across the open sides. The corner position leaves the room center free, helping smaller bathrooms feel open. Splash control depends heavily on showerhead aim and panel size, so plan carefully where water lands.
Open Walk-In With a Single Fixed Panel
A long rectangular shower zone sits along one wall, separated only by one frameless glass panel. Entry is completely open, often 36 inches or wider, suiting wheelchair users and anyone who dislikes doors. It needs enough length, typically 60 inches or more, for water to stay in the zone.
| Layout | Best For | Build Complexity |
| Full wet room | Large primary baths, new builds | High |
| Alcove with linear drain | Most remodels, contemporary look | Moderate |
| Corner with angled glass | Smaller bathrooms | Moderate |
| Open walk-in, single panel | Spacious baths, wheelchair users | Moderate |
Getting the Slope and Drainage Right
Without a curb to contain water, the floor itself becomes the containment system, and that means precision. The widely used minimum slope is a quarter inch per foot, about a 2 percent grade, running continuously from the shower edges toward the drain. Too shallow and water lingers or escapes; too steep and the floor feels uncomfortable and looks visibly tilted.
A linear drain, a long narrow channel set along one wall, lets the floor slope in a single direction. That one-way plane is simpler to build and works beautifully with large-format tiles that would otherwise need awkward pie-shaped cuts. Linear drains can also sit at the shower entry, catching water before it migrates into the dry zone. A center point drain needs the floor to pitch inward from all four directions, meaning more complex tile cutting and a busier pattern.
The shower floor must sit slightly below the surrounding bathroom floor so water cannot travel outward. In a remodel this means recessing the subfloor to fit the drain body, sloped bed, membrane, thin-set, and tile. On timber floors this often involves modifying joists, which then need reinforcement; on concrete slabs it means cutting a recess. Skipping this step is one of the most common causes of water escaping into the bathroom.
| Feature | Linear Drain | Center Point Drain |
| Floor slope | Single plane, one direction | Four-way pitch |
| Tile compatibility | Large-format tiles lay flat | Small tiles or angled cuts |
| Typical unit cost | About $300 to $900 (estimate) | Generally lower (estimate) |
Waterproofing: The Layer That Decides Everything
With no curb as backup, the waterproofing membrane is the only barrier between daily showers and structural damage. Use a continuous sheet or liquid-applied membrane over the whole sloped floor, tie it into the drain flange, extend it up the walls, and crucially out onto the bathroom floor beyond the shower, since some moisture migration past an open entry is normal. Before tile goes down, flood-test the assembly: plug the drain, fill the pan, and hold water for 24 hours. This inexpensive step catches failures while they are still fixable, before they surface as stained ceilings or mold inside wall cavities.
Accessibility Dimensions That Shape the Layout
Borrowing dimensions from established accessibility standards produces a shower that genuinely works for people with limited mobility. The ADA Standards apply legally to public facilities rather than private homes, but their measurements reflect decades of research, and residential codes in many regions reference similar figures. Verify current local requirements before building:
- Threshold height: half an inch or less, beveled, or fully flush for a true zero-entry transition.
- Shower size: minimum 30 inches deep by 60 inches wide, with a clear opening of at least 36 inches for roll-in use.
- Grab bar height: 33 to 36 inches above the finished shower floor, on back and side walls near entry and exit.
- Grab bar backing: reinforce walls during framing to support at least 250 pounds of force in any direction at bar locations.
- Controls: within 48 inches of the floor, one-hand operable, plus a hand-held spray unit for seated use.
- Maneuvering space: 60-inch turning circle in the bathroom and a minimum 32-inch clear doorway so users can reach the shower.
Grab bars no longer need to look institutional: brushed nickel, matte black, and bronze finishes match mainstream fixture lines. Plan backing during framing, since retrofitting support behind finished tile is disruptive. Pair bars with slip-resistant flooring, a bench, and a hand-held showerhead for a space that serves everyone without looking like a care facility.
Planning Checklist: From Concept to Construction
Structural survey: have a contractor verify the floor structure allows a recessed, sloped shower pan and sensible drain placement.
Layout and drainage: the alcove with a rear-wall linear drain suits most remodels; keep the drain near the existing waste line.
Slope calculation: map the quarter-inch-per-foot fall from the high point to the drain across the full footprint.
Waterproofing: specify membrane type, wall upstands, drain-flange integration, floor extension, and a 24-hour flood test in writing.
Accessibility detailing: mark grab-bar positions, bench location, control height, and doorway width so rough-in matches.
Permits: curbless conversions and plumbing changes typically need permits; confirm locally.
Contractor selection: ask specifically about curbless and linear-drain experience and how they verify slope and waterproofing.
What Threshold Free Shower Designs Cost
A curbless conversion costs more than a standard curbed shower because the floor must be modified and waterproofing executed precisely. All figures are estimates and vary by region and labor rates.
| Scope | Typical Range (Estimate) |
| Curbless shower conversion (shower only) | $3,500 to $8,000 |
| Basic full curbless remodel | $6,000 to $10,000 |
| Mid-range remodel (linear drain, custom glass) | $10,000 to $18,000 |
| Premium custom project | $18,000 to $30,000+ |
| Linear drain unit | $300 to $900 |
| Subfloor modification | $500 to $2,000+ |
The premium over a comparable curbed shower often runs about $800 to $2,500. Against that, weigh the long-term value: a barrier-free, easy-to-clean shower supporting aging in place is a durable selling point, and bathroom remodels with universal-design features are widely reported to recoup a strong share of their cost at resale.
Six Common Mistakes to Avoid
- Too little slope. Anything under a quarter inch per foot lets water wander; verify the pitch with a level before tile sets.
- Waterproofing stops at the shower line. Open entries always pass some moisture; carry the membrane onto the bathroom floor.
- Drain placed for looks. Position the drain to intercept the water path, ideally at the entry or along the main fall line.
- Cutting joists without reinforcement. Recessing a timber floor weakens structure unless headers and reinforcement are added.
- Slippery showpiece tile. Confirm slip ratings before ordering; glossy tile on a sloped wet floor is a fall risk.
- Skipping the flood test. A 24-hour plugged test before tiling is the cheapest way to catch membrane failures.
Safety and When to Call a Professional
Threshold-free showers involve structural, plumbing, and waterproofing work where mistakes hide until they turn expensive. Use licensed professionals for joist modification or slab cutting, drain relocation, and the waterproofing installation itself. Electrical work for heated floors or lighting belongs to a licensed electrician. DIY-suitable tasks include demolition, painting, and installing grab bars where solid blocking already exists. If you see sagging floors, musty odors, or water stains on ceilings below, stop and get a professional assessment first, since these signal existing moisture damage a new shower will not fix.
Final Thoughts
Threshold free shower designs earn their place in contemporary bathrooms by doing two jobs at once: they create the calm, unbroken surfaces modern interiors are built on, and they remove the biggest physical obstacle in the bathroom. The formula is unforgiving but simple: a quarter inch of slope per foot, a drain positioned to catch the water, a continuous membrane extending past the shower, and a flood test before tile. Your next step is a structural survey of your bathroom floor, because what the joists or slab allow determines which layout is actually buildable.
Frequently Asked Questions
Does a threshold-free shower flood the bathroom?
Not when designed correctly. A consistent quarter-inch-per-foot slope toward a well-placed linear drain keeps water in the zone, and extended waterproofing handles minor splashing. Flooding comes from shallow slope, poor drain placement, or a shower too short for the spray pattern.
Can any bathroom be converted to a curbless shower?
Many can, but not all without significant work. A contractor must verify the floor allows a recessed sloped pan, the drain can sit sensibly relative to existing plumbing, and waterproofing can be extended. Concrete slabs and shallow joist cavities are the most common constraints.
Are threshold-free showers safe for elderly users?
They remove the trip hazard and step-over, which helps, but real safety also needs slip-resistant flooring, grab bars at 33 to 36 inches, a bench, and a hand-held showerhead. Plan these supports together rather than assuming the lack of a curb is enough.
Do curbless showers cost more than regular showers?
Yes, typically. The premium over a comparable curbed shower is often estimated at $800 to $2,500, driven by subfloor modification, precision waterproofing, and usually a linear drain. Get itemized local quotes for accurate figures.
What is the difference between a curbless shower and a wet room?
A curbless shower is a shower zone with no raised threshold, often still partly enclosed by glass. A wet room waterproofs the entire bathroom floor and treats the whole room as the shower area.
How do you clean a threshold-free shower?
Cleaning is generally easier: large-format tiles mean fewer grout lines, there is no curb ledge or door track collecting grime, and the open layout gives full access. Squeegee glass after use and keep the linear drain channel clear of hair and debris.
Do I need a permit for a curbless shower conversion?
In most jurisdictions, yes. Drain relocation, structural floor modification, and plumbing changes typically require permits and inspections. Confirm exact requirements with your local building department before work begins.

